

❤ ❤ ❤
When you’re located on the opposite side of the world from where these dang codes are being given out, you pretty much give up the thought of ever owning one of these beauties.
A big, big thank you goes to Gazimoff, who generously thought of sharing the codes he picked up via an online competition, and also to the folks at ArenaNet who generously gave him a bunch more codes to give away.
(Not to mention, the good souls working ArenaNet Support who swiftly responded within a day – during the weekend – and managed to fix the issue of code and account region not matching by manually applying said code to my account.)
Some really ingenious golem designs were submitted: among the winners was a Trahearne golem and Skritt golem very worth checking out, and all the other contenders whom you can see in the comments here were making me lose hope that my humble, amateur effort would make it. 🙂
Which, by the way, was the semi-secret work-in-progress project alluded to previously.
I’d only been procrastinating on painting miniatures for merely ten years now, so of course step one to getting back into the habit – decide to model and paint up a golem for the competition with a two week deadline… for fun!
—
Some GW2 wiki research on golems produced a very nice concept art of a giant golem.

I doubted I had enough “green stuff” Kneadatite epoxy putty left in the house (the usual substance of choice for miniature sculptors of the Games Workshop/Reaper Mini backgrounds), nor its workability after a decade, so of course it became a big craft experiment into the world of air-dry modelling clay, which was way more easily available at a neighborhood book/stationery store.
Except they didn’t have any white color in stock either, so I had to settle for peach.

Fortunately, asura aesthetics tend toward the geometric, which make things a lot more achievable for an amateur just enjoying the feeling of getting hands all gunked up with clay and shaping stuff.
Make a rectangular cube here, a ball there, a triangle or a pyramid elsewhere… Let it dry a bit. Then try to stick them together.
Curse and swear when things don’t.
Cudgel brain for solutions and resort to grabbing some wire to thread the shapes through and pin one to the other.
In retrospect, I’d make a more proper armature next time.
But for what was essentially a prototype of a prototype, just an idea simmering around in my head, the discovery process was pretty fun.
(I did have to resort to the ol’ rock trick to stabilize one super-heavy arm though.)
—
Several days of shaping and drying later, it was time to work out the painting kinks with a much larger surface area to practice on than a normal mini.
Step 1: Priming

The really amazing thing is that both my black and white paint-on gesso primer and my Vallejo paints were doing just fine after so long a time of being ignored. (Go go air tight containers! Betcha your spray primers and cruddy Games Workshop paint pots can’t match that.)
Black and white priming is a variant technique that I experimented with and found I liked (thus avoiding the holy war of solely black primer vs white primer.)
Priming black gets black into all the deepest shadows, and with my particular brand of gesso, goes on more smoothly than white.
The problem is that subsequently painting colors on top of such a black coat takes forever, especially if you use thin coats of paint or your paint tends to translucency. Colors tend to be more dulled and less bright than applied on top of white primer.
Enter the drybrushed white primer on top of the black primed layer.

I was a little rough with the drybrushing on this big model, as most of the surface was meant to simulate stone anyway.
(So rough the right arm fell off. Cue hasty ball of clay propping up the re-attached and heavily superglued limb into position.)
The idea of drybrushing white primer is to lift out all the surface detail (which would be there on a less amateurishly sculpted model) while leaving black in the crevices, giving some instant contrast.
Step 2: Basecoat

In this case, I did end up obliterating most of the primer contrast when I added the grey basecoat since it was more of a slapdash preliminary test of contrast.
You may notice I smear a lot of paint on the supporting paper.
After learning one too many times the hard way why one should not apply an unknown glop of paint directly onto a model, it’s just a habit I developed to test how much paint is loaded onto my brush.
(I find tissue too absorbent for this, and while testing it out on one’s nail or thumb does work, it nets you a lot of strange looks later when your thumbnail is streaked with multicolor acrylics and is a bitch to scrape off, even with soap and water and plenty of scrubbing.)
Step 3: Wash (Shading / Color tinting)

It was a little too grey, so instead of simply washing with a darker grey to add shadows, I opted for a thinned down layer of brown and let it pool in the recesses to simulate more of a dirt / granite look.
Step 4: More Painting Steps Combined into One

The lighting is a bit bright in this shot, but lighter greys were subsequently drybrushed in layers to create a more ‘rough stone’ textured look.
The brown wash got added to the untouched black-and-white primed rock and turned it fairly interesting and differently rock-like right off the bat.
A blue basecoat was applied to the cubes that were going to be ‘power crystals.’
While I was now more or less satisfied with the ‘stone-ness’ of the main body parts, it was becoming obvious that the model was too big and low detail for a simple wash and drybrushing to provide sufficient contrast.
Step 5: Layering – Shading to Highlighting

Enter a slightly clumsy recollection of a more advanced painting technique.
Layering involves thin layers of paint, applied more carefully than washing all over the model with a thin layer of paint or drybrushing across the entire model.
Shade is applied in areas which are likely to be in shadow. In this case, a thin layer of black paint was used – note the translucency. The basecoat color (and my painstaking stone texture) is meant to still show up under it.

Then from black, we go back up to the basecoat grey, a thin layer again, to blend with the shadows and smooth out any clumsy brushstrokes of black that may have gone in places not meant to be black.

A little white is mixed with the basecoat grey to get a lighter grey color as the first highlight.
This is where the magic starts to happen after all the previous patient steps. The highlight is applied on all the raised areas where one would expect light to hit.
And you can start to see the forms take on a more defined look with contrast that wasn’t there before.

We push the contrast even further with one more layer of highlight, grey mixed with even more white, and add it to the very tips and edges.
Really dedicated painters do even more layers for the smoothest blends. I could have done more smoothing of the black and grey parts, for example, but I was already getting too excited and eager to finish.
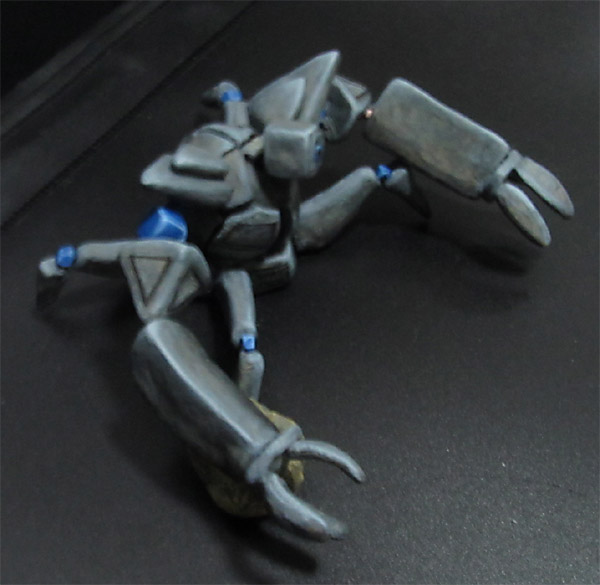
Power crystals were highlighted up in the same manner and I was happy to call it done. For now.

—
The photos were duly submitted along with the design idea, a siege golem specialized for that last bastion of WvW – fortified walls.
Trebs take forever. I overheard a guy wanting a siege tower to roll right up to the walls and unload the zerg off. Well, who needs those when this beaut could stomp right up and tear that frickin’ wall down?
It needed a name just like the Omega Golem so that “OMG OMG OMG” would be a great abbreviation for when folks see a bunch of either golem trundle up to their keep.
Thus, the Omicron Golem was born.

And I had just the right Asuran designer for it too.
Greetings and salutations!
Fortified walls in the Mist War get you down? I bring to you the next evolution of siege golem, just as game-changing as the Omega Golem from an Alpha.
The Omicron Golem is designed to tackle what the Alphas and Omegas cannot, the solid stone and metal structures of a keep left too long in enemy hands. Why endure primitive bookah technology like catapults and trebuchets pounding away for eons when you can roll up in air-conditioned comfort and direct the Omicron to deconstruct fortifications just as rapidly as Omegas on gates?
Inspired by a historical image discovered in an old abandoned asuran lab, and re-utilizing salvaged Inquest technology for better purposes, this new design marries the latest in eco-friendly thaumafusion power crystals with the robustness and longevity of a proven golem construction material: granite.
It is eventually biodegradeable, but will last you centuries! (See footnote 1 in small print.)
Its four-legged chassis is able to navigate rough terrain where wheels or bipedal models may operate at severely reduced efficiencies. Its three-digit hands are numerically efficient, with each digit able to rotate independently and form a claw or hook as required for grasping material or a shovel for earth-moving. Its camera and vision functions are programmed for wavelengths in the electromagnetic spectrum from infrared to x-rays to best determine optimal areas of weaknesses to attack a fortification.
An add-on purchase can be made for lens crystals and arcane mirrors that generate a defensive laser beam from its eye. Other optional add-ons include cushioned seats for asura and bookah sizes, an audio-generator that automatically provides music for optimum relaxed alertness or aggression as the situation dictates, and an excellent espresso machine.
No sentient creatures were harmed in the making of this golem.
Yours truly,
Shudd
Genius Inventor, Pact Commander, and the distinctly better half of
Shudd & Shodd’s Agency for World Domination
1: Claim does not apply in eventualities such as hostile acts of the enemy, civil commotion, sabotage, or other unforeseen acts of gods. Fire, flood and earthquakes may increase wear-and-tear and induce diminished operating lifespan.
I’m really glad Gazimoff liked it, because now I have a virtual mini to go with the RL one too.
Mr Sparkles is absolutely awesome.
And this guy fits in the palm of my hand pretty snugly.
P.S. World domination plans are coming along nicely, says Shudd.

That’s super neat! Didn’t know you were into painting mini’s. Did you used to do anything with W40k?
-Ursan
LikeLike
Used to. A couple of Dark Angels, but never got around to the rest for myself. Painted some Orks and Blood Angels for a club.
I spent more time working on a bunch of Skinks and Sauruses for a Lizardmen army, a couple Necromunda figs, then got side treked with single figures from assorted companies like Reaper, TSR, etc.
I need to get off my arse and start working on the massive Reaper Bones collection that I’ve now accumulated.
Soon(TM). *hem*
LikeLike