Table of Contents
1. Philosophy
2. Settings:
a) WASD Movement, Mouselook and Strafing
b) Comfortable Keybinds for Dodging and Other Utility Skills
c) General Options and Targeting Practice
3. On Ranged and Melee Combat
a) The Importance of Flexibility
b) Getting Used to Approximate Ranges
c) The Shapes of AoE Skills and Melee Cleaving
d) A Brief Word on Hitboxes
e) Animation-Based Combat and Dodging
f) Movement and Positioning Strategies
g) A Quick Word on Aggro
4. Fundamentals of Combat and Doing Damage
a) The New Trinity – Damage/Support/Control
b) Coping with Conditions
c) Buffing with Boons
d) Combos
5. Miscellaneous Combat Concepts
a) Crowd Control and Interrupts
b) Playing with Projectiles
c) Moving in the Blink of an Eye
6. Conclusion
1: Philosophy
This guide is not meant for reading through in one sitting, though you can try. 🙂
There are a lot of concepts I wanted to touch on, to highlight that combat without the holy trinity does not mean that there is no depth, or that it’s all too confusing to puzzle out, and this guide ended up being a very dense tome.
It’s meant as more of a step-by-step tutorial or an encyclopedic reference, for you to pick a section that you may be unclear about, read for understanding, then jump into the game to practice and familiarize yourself with the concept.
The overall goal is to teach concepts – not the specifics of any one encounter, but general principles that can then be recognized and applied in new situations.
Rest assured that just as Rome wasn’t built in a day, you aren’t expected to know all of this by heart in a single day as well. Heck, I didn’t write this guide in a single day. Pick a concept, try it out in game, practice with it until you get it, then pick something else and work on that.
Don’t forget to have fun while doing it!
(I write this under the assumption that you -want- to learn and improve, that learning these concepts are interesting, and that you’ll have fun seeing yourself get better at the game and not die so often. If it all feels like too much to take in, throw this out and just wander around the GW2 world and enjoy yourself playing in a way that suits you best.)
2a: WASD Movement, Mouselook and Strafing
This guide will be assuming that you will be using the keyboard to move and strafe, and the mouse to move the camera to look around and to turn.
If your keys are on the default settings, please go to your keybinds and change A and D to strafe left and right.

You will be holding down your right mouse button and moving the mouse to turn your character, whereas holding down the left mouse button will rotate just the camera when you move your mouse.
Even if you are not used to these controls, it is worth taking the time to learn how to move around this way. Keyboard turning slows you down in comparison to someone who uses mouselook to rotate the camera, and will make some movement strategies like moving in a circle much trickier.

Feel free to take as much time to practice getting the hang of moving with the WASD keys with one hand and operating the mouse with the other.

If for whatever reason, you have other preferences or needs, such as changing WASD to another set of keys like EDSF, or own specialized mice or keyboards or other controllers with extra buttons and function keys, I assume you are competent enough to manage and decide on your own keybind settings that work best for you.
If you are new to the MMO genre, I do suggest trying out what has been proven to work for other players first, then tweaking to suit your own needs. Changing the default keys though -is- recommended, as the defaults may not be placed in the most convenient or accessible locations for your hands.
The ultimate test, of course, is how smoothly and swiftly you can move in-game and solo champions and fight other players using your own setup.
2b: Comfortable Keybinds for Dodging and Other Utility Skills
Other keys you may wish to consider binding to more convenient locations:

The default dodge is set on V, which is actually pretty decent a location.
As you can see, I have used Z, X, C, V for my utility skills 6-9 as I am personally used to having a heal on Z and find the other keys more convenient to reach.
Your mileage may vary, but many do find the keys 6-0 to be quite uncomfortable to keep reaching towards. Consider binding them to keys that more accessible by your left hand. (Or MMO mouse users may enjoy using their thumbs to reach the many buttons on their mouse. Whatever is most comfortable for you.)
It is worth giving careful thought to this setup as ill-chosen or ill-positioned keys that you get accustomed to -can- affect your gameplay.
As an example, take my R to dodge key:
It is easy for me to hold R and move left at the same time, or just press R, or press R and back, or even hold R and back/left simultaneously to dodge diagonally, but it is a lot less easy for me to coordinate R and moving right. I will have to take my finger off W (move forward) to do so.
As a result, I will very rarely dodge to my right if given the choice. If I PvPed more, this would be a weakness that some people could exploit.
I’ve shoehorned in a second option I can use, shift+mouse button 4, but I would have really been better served if I had a mouse button 6.
Why not just use button 4? Well, I have that for AoE loot and have gotten too used to spam clicking it.
Why not just use shift? Because I use shift as a modifier for many other keys and cannot keep dodging every time I press that plus the other keys.
The function keys F1-F4 are also a little out of the way for me to press, and for classes like the guardian or elementalist, one may want to press them very often.
My preference is to use shift+e, shift+r, shift+f, shift+g / shift+space as these are all very accessible to my left hand. Your mileage again may vary.
Moral of the story: Think carefully on what you want to use and will get familiar with.
Spend some time now to bind your keys and practice with your setup.
2c: General Options and Targeting Practice
Before we begin, these are the settings that should be selected (or deselected) by going to the Esc => Options menu:

Let’s go through them in order:
Fast cast with Range Indicator is the best of both worlds for Ground Targeting. Holding down the skill key will give you a targeting circle to show you the range and size of the area of effect, and letting go of it will cast the skill. This allows you to aim spells with accuracy when you need it, or are unfamiliar with the range, but also allow you to snap off the spell very quickly when you want to speedily cast it by tapping the key with your mouse cursor already positioned where you want it to go.
Double-Tap to Evade is best turned off. Why? The first time you inch forward nervously in a jumping puzzle and twitch juust a little too fast, you will know why.
Also, double-tapping takes time. We want to get used to dodging on one keypress so that your reaction speed is faster than someone who presses a key twice. Bind your dodge key and get to love it.
Disable Area of Effect Rings… uhh, no. We want all the clear telegraphing we can get, so that we don’t stand in the fire or other nasty things that red circles mean.
Whatever-Click to Attack/Interact – Well, ok, this one is preference. Have it on or off, it shouldn’t really matter, unless you find yourself attacking/interacting too easily when you don’t mean to.
Stop Autoattacking on Target Change – Yes. But but… convenience, I hear you protest. In this guide, I am going to teach you precision. That means, you attack the stuff you mean to attack, you don’t attack the stuff you don’t mean to attack. Letting the computer decide for you what you’re going to autoattack blindly is highly imprecise and may come back to bite you one day when you accidentally switch targets and aggro something you didn’t want to aggro.
Autotargeting – See above. You are the human. You have the brains. You call the shots. Not your game, who will tend to just point you towards the nearest thing, or the nearest champion that will soak up all your damage as a punching bag with lots of hitpoints, while lots of little things are busy killing you. You prioritize the targets, not your computer.
Promote Skill Target – What this does is if you have no target selected, and you press a skill, the computer will “help” you select a target using its own questionable judgement of nearest, most convenient thing to attack. Turn it off – there will be times where you don’t -actually- want to select any target.
For example, if you want to use a leap skill to leap away from enemies to escape, you -definitely- do not want the computer to helpfully decide for you that you should jump back towards the enemy instead.
Melee Attack Assist should be off as we want to be able to pass through mobs for more advanced combat techniques later. Having it on leaves you at the mercy of the computer insisting that you have collision detection and -will- stand in front of something about to hit you very hard… not the most ideal situation ever.
Manual Targeting Practice
In high-level combat, being able to pick and choose your targets in order of priority (such as dangerous and annoying damage-dealers or summoners first, eg. Aetherblade Strikers or Toxic Hypnoss) will save both your group and yourself from a lot of unnecessary damage, as opposed to just hitting the nearest thing and continuing from there.
There will also be times where you need to quickly deselect a target so that you don’t end up with all your projectile shots back in your face when the target uses a reflection skill, or to use a skill that performs best with no target selected (such as a leap in a direction that doesn’t face any enemies, or when you want to cleave multiple enemies without necessarily facing one of them.)
Thus, learning to target enemies yourself, scroll through them quickly, and untarget them will stand you in good stead from the very beginning.
Selecting Targets:

There are two main options for targeting: keyboard and mouse.
For the keyboard, you should have keys bound to Target Nearest and Target Next. (Target Previous is less necessary, as you can always reset with Target Nearest, but that’s up to your preference. I use E for Target Nearest, Q for Target Next as Tab is my weapon switch. YMMV.)
Practice scrolling through targets with your keys to get a feel for how the targeting works.
In a Dynamic Event that is scaled up to produce Champions, you may notice that the targeting has a tendency to prioritize Champions over other mobs.
There will be some cases where there are so many mobs to scroll through using the keyboard, that you may find it faster to pick a target with the mouse. In crowded events, choose a mob in the back and practice clicking on them with the mouse to select them. Getting used to moving your mouse cursor around the screen will also help when you want to target specific locations with your area-of-effect skills.
Marking Targets:

You can also mark targets with CTRL+T, which puts a red target over their heads.
Pressing T will select that target.
This is also visible to members of your party, and they can assist by pressing T to select that target too.
De-targeting:
Unselecting targets can also be accomplished with both mouse and keyboard.
Click anywhere in the background (anything not a valid target) to deselect your current target.

In the situation where the screen is crowded with mobs, it may be more convenient to use your keyboard to unselect targets.
There are two options for this, both with their own little quirks to get used to:
- Bind a key to Lock Autotarget.
- Bind a key to Sheathe Weapon
(I use Alt+E for Lock Autotarget and ` for Sheathe Weapon. Again, YMMV.)
Lock Autotarget acts differently depending on how your autotargeting is set up. With the options I have given you though, it will deselect targets. It does tend to let one or two extra shots get through before the game realizes that the target is deselected, but it is generally quite reliable to stop DPS on demand.
Sheathe Weapon tends to stop attacking immediately… -when- it decides to work. If it doesn’t, you will continue autoattacking and may have to keep spamming the key a few times. On semi-rare occasions, it may decide not to work at all.
I suggest getting to know all your options so that you can use them as needed.
Practice targeting and attacking some relatively harmless open world mobs, and then detargeting and pausing DPS on demand. Re-select them and continue attacking off and on until they are dead.
3a: The Importance of Flexibility
In Guild Wars 2, all classes are capable of ranged and melee combat. (Engineers being an odd exception in that many of their skills are AoE in some fashion, but they too have kits best used at close or mid-range.)
Do not make the mistake of assuming that a ranger only does ranged damage and a warrior has to be up front and personal all the time.
To play a class to its best potential, it is important to be comfortable with both options and flexible enough to switch between melee and ranged combat as the situation requires.
In general, melee combat tends to do more damage than ranged combat in Guild Wars 2.
This is a trade off for giving up safety from range, and produces a more interesting tension between the decision to get up close and kill something faster but risk receiving more damage in turn, or plinking away from range with more room to move and dodge.
For this next section, visit a trading post (or an NPC weaponsmith) and buy affordable versions of all the weapons your character can use. You will be familiarizing yourself with all of them, so that you can switch in the most suitable one for the situation you find yourself in.
3b: Getting Used to Approximate Ranges
For ranged combat, it is good to get familiar with the approximate range of your weapons (and that of other classes.)

Long range tends to be from 900-1200 range.
There are a few skills that can go up to 1500 range, though they usually require an extra trait. (eg. Warrior rifle Kill Shot is 1500 untraited, Ranger longbow can be traited with Eagle Eye, Engineers can trait grenades for extra range with Grenadier, Elementalist has a 1500 range Arcane Blast utility skill, etc.)
Out of Range Indicator:
If you have an enemy targeted, a red bar below your skill will indicate whether you are out of range for that particular skill to land.

Mid range is around 400-600.

Close or melee range is around 130-150.
Take some time to practice with all the different weapons at your disposal to get used to their ranges.
3c: The Shapes of AoE Skills and Melee Cleaving
Some skills do Area of Effect damage (AoE) which occurs over a defined area. This shape is often a circle, but can be a triangular cone or a rectangular line, depending on the skill.
If you have fast cast ground-target indicator on, you will have the best of both worlds, as you will be able to hold the key to see the shape and precisely place the skill when needed, or snap it off quickly by tapping the key with the mouse cursor over the location you want when you are already used to how the skill works.

AoE effects that originate from the player (or Player-Based AoEs / PBAoEs) may not have a green targeting indicator. The extent of their range will be shown as an animated effect, some fairly accurately….


… while others less so.
Certain visual effects may be affected by the height of your character, and may not reflect the true range of the skill effect.


Despite the dinky size of the visual effect on the asura, the actual range is the same for both characters.

Only practice and experience will help you get familiar with these little visual quirks. Visualizing the underlying shape of the spell effect may help.
Enemy AoE effects are most often marked as a red circle. It’s generally a good idea to avoid standing in these.

In high-level fights, a bright orange circle has recently been introduced as a clearer indicator of where damage is going to land.

There will be a few cases where damage in an area is not indicated with any indicator beyond a visual effect, so be on the lookout for these as well.

A quick note for modest computers and graphics settings: You know your own computer best, but if you do find yourself starting to lag or framerates dropping in big zergy fights to the point where it’s affecting your ability to stay upright, you may want to seriously consider cranking down the visual bling, all the way down to maximum performance and no shadows if you really need to. You can always turn it back up again later.
The Shape of Melee Cleaving
Melee attacks can cleave. To best picture this, imagine that as you swing your weapon, this shape is created.

Anything within this cone can be hit.
Depending on the weapon you’re using, the limit is normally 3 targets for a melee-cleaving weapon like a sword or greatsword or hammer. Thief and necromancer daggers cleave only 2 targets. AoE skills and guardian staff autoattack can hit up to a limit of 5 targets at a time. Mousing over the skill to read the tooltip will normally show the number of targets it can affect.
This cone is not visible, as we’re not playing Wildstar with all its colorful shape telegraphing, but you can feel out the extent of the cone by experimenting with harmless yellow mobs.
1) Deselect your target, so that you don’t automatically face towards it when you attack. Adjust your camera and character so that the enemy is somewhere within the cleave range.

2) Try to hit it, pressing 1 repeatedly, creeping closer and closer until you do.

It may surprise you, but many melee weapons have a surprisingly wide reach.


Why would you want to know this?
Being familiar with the range of your cleave lets you hit multiple targets by placing yourself in an optimal position to hit both at once.

(You may have to deselect targets to face yourself in between them, rather than turn automatically turn to face one or the other if they’re targeted. Good thing you know how to deselect targets quickly!)
3d: A Brief Word on Hitboxes
As Wikipedia explains in layman’s terms, hitboxes are an invisible shape used in computer games for the purposes of collision detection.
I am not precisely aware of the shape of the hitbox being used in Guild Wars 2, or if they’re using bounding boxes or something else, but for our purposes, it is sufficient to imagine something like this:

Or this:

All player characters share the same size hitbox, regardless of race or height. This is in the interest of fairness, and also to reduce the perceived necessity of everyone using the smallest characters to fight each other.
(Small characters already do have some advantages in that their animations are harder for a player to see and predict. They may also be overlooked or underestimated, due to our very human brains, which naturally find it much harder to ignore something huge and in our face, than something small and unassuming.)
This means that size may sometimes be deceptive, depending on your camera angle and how you’re used to measuring distance.
In the pictures above of a max height Norn thief and smallish size Asura thief, the reach of their dagger autoattack is actually the same range, if you look from the center of mass to center of mass.
If you’re using the tips of their weapon to judge distance though, you may be fooled into thinking that it’s different or assume you have to get in closer when you don’t actually have to.
Depending on the specific ability or weapon size, this can become very deceptive. Take the warrior greatsword on minimum height Asura and maximum height Norn:

The Norn is always visually making contact with the mob due to his size plus the greatsword’s size. The asura hits from what seems like a lot further away. But both ranges are absolutely the same when you look from center of mass to center of mass.

The best way to get used to this is to practice and experiment as you make your way out in the Guild Wars 2 world, look from center of mass to center of mass, and always keep an eye on the out-of-range red indicator at the bottom of your skills.
There is also an advanced technique of hitting multiple hitboxes of a large enemy that exists as an object in the world (as indicated by the big cross-hair targeting that you will have seen on the last boss of each race’s tutorial.)

The goal then is to position yourself so that your melee cleave (which is a big semicircle, remember) can hit at least two of those zones at once, so that you will do double damage. Or triple, if you can make contact with three zones at once.

Note that after the Sep 9 feature patch, double damage now shows up as separate white numbers over the zones one is aiming to hit.

3e: Animation-Based Combat and Dodging
Guild Wars 2 combat is animation-based. All attacks performed will play an animation with some degree of telegraphing before the attack hits, and follow through with some kind of animation showing the result.
Careful observation and analysis of what enemies are doing can help us understand and predict their attacks, subsequently avoiding or countering them with smart play.
I will be walking you through several examples of how to analyze mob attacks.
We will be using the combat log, which should be located in a separate chat tab by default in your chat window. The combat log, although it does not show your character’s condition damage or pet’s damage, will record the damage of your power-based attacks, and for our purposes, the damage and NAMES of the attacks enemies are using to hit you.
A quick reminder to have a single key bound to dodge for the following examples, so that you can react with speed. Double-tap to evade should be off, to save yourself from jumping puzzle aggravation and because tapping a key twice takes longer than tapping a key once.

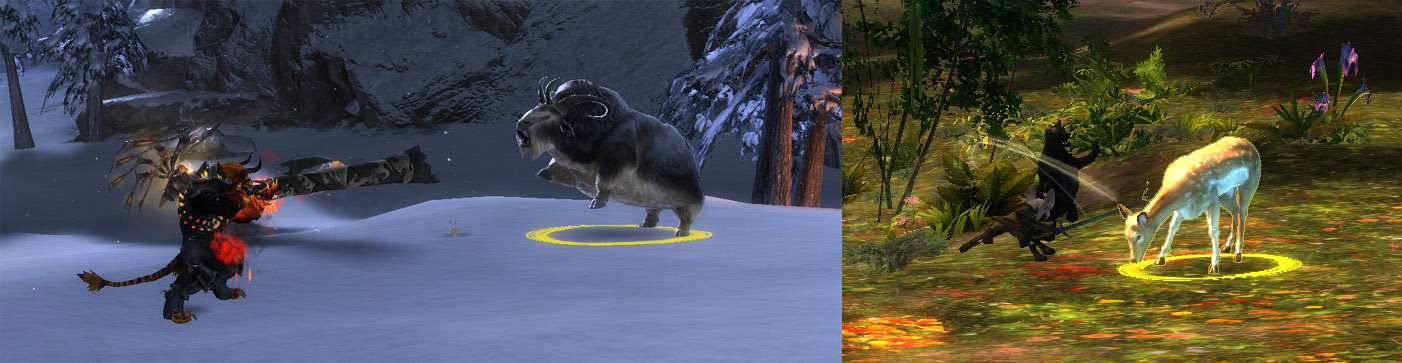
We begin with a super-simple level 2 moa. Just find any moa in a level 1-15 initial zone for any race, they should all be similar.
Turn off your autoattack, as you’ll kill it otherwise, hit it once to aggro it and let it hit you.
You should observe two attacks. Screech, where it will rev itself up slightly before exhaling a cone-shaped effect, and Peck, which it does.
At these low levels, there are no actual effects besides damage attached to the skills, despite a “Dazes” description if you target the moa.
Heading up to Gendarran Fields, a level 25-35 zone, we find a golden moa near the Almuten waypoint.

Repeating the same process shows that it has the same two skills, Peck and Screech, but this time, if the screech connects, we are dazed – as highlighted by the pink border around our screen, and the “daze” icon in our status bar.
This would be a good time to see how fast you can dodge away when it screeches.

In this case, I was hit by one screech before the evade invincibility frame kicked in and prevented the other four parts of the screech from hitting. The daze did not manage to stack in duration and was gone in the blink of an eye.
Contrast it with standing still and letting all five parts of the screech connect with you.
Our friendly golden moa has a neighbor right next to it – crimson moa.
This variant, as indicated in the description when you target it, inflicts vulnerability. How? Hit it and see.

It still Pecks, but it doesn’t screech. Instead, it flaps its wings, rears up on its legs and Deadly Kicks, which applies vulnerability along with doing damage.
In the nearby field, there are some Plains Wurm Hatchlings to play with.

You may notice that these baby wurms have slightly different behavior depending on if you’re in melee or trying to stay at range from them.
If you stand near them, they’ll happily proceed to Bite you.
Walk a distance from them, and they will approach you by burrowing themselves in the ground (thus evading your attacks for that period) and then bursting out with Rock Shards – which applies 3 bleeds and a cripple along with damage.
Heading to Stonescatter waypoint in Lornar’s Pass and going north from there, we find a relative of the plains wurm, the ice wurm in various growth stages.

You should observe exactly the same behavior in ice wurm hatchlings. They Bite and they burrow toward you, but explode out of the ground with Ice Shards instead. Same bleed and cripple effect though.
The grown up version, the ice wurm, now exhibits a very interesting behavior.
They now try to play keep away from you. Walking near them will send them burrowing (and hit you with Lurk) and they will back off.

Let them stay at range, and they will happily proceed to toss boulders at you with Frost Siege.
This attack, by the way, is one of my favorite examples to practice dodging on.
It is super-obvious. The wurm will glow for a while to telegraph itself. It will then hurl the boulder. Because you’re at range, you can easily see the boulder coming towards you and have plenty of time to hit dodge.
Getting your timing right might take a moment of practice, but after that, you should be able to dodge every Frost Siege attack with 100% reliability. A double evade will show up if you succeed. If you fail, it explodes in a very obvious burst of ice and chills you as “punishment,” slowing down your movements, but isn’t too lethal, so you can keep practicing until you get it perfect.
Conveniently in the same place, north of Stonescatter waypoint in Lornar’s Pass (see position on the minimap), is a very easy champion ice wurm, Frostmaw.

He makes for great dodging practice. Your goal is to dodge all of his thrown rock boulders and walk away without a scratch, event done and champion bag in hand.
All he is, is a big grown-up ice wurm.
You -could- run in to melee him…

…but you’ll find out that he has the same behavior as normal ice wurms. He will burrow himself and hit you with Lurk, and then try to run off. When he comes out of the ground, he will hit anything near him with Rock Shards.
Or you could just sit at range with him since he wants to, and exchange tennis balls (or sharp pointy objects.)
Except you dodge all of his attacks and he soaks all of yours.
Goodbye Frostmaw.
If Frostmaw isn’t around, you can also look for the Champion Ice Wurm in Posternus Caverns in the same zone, Lornar’s Pass.

A little patience, ranged autoattacking, and good dodging practice equals one dead champion wurm.
Directional Dodging
Now that you’ve mastered the art of reading combat animations and pressing the dodge key at the correct time, we will take it up one step further by choosing a direction to dodge in.
Pressing a WASD direction plus your dodge key, will send you rolling in the specified direction.
One example of where you might want to dodge sideways is the Risen Abomination. (One level 53 example can be found west of Bogside Camp waypoint in the Wraithwalker Woods portion of Bloodtide Coast. And plenty of others can be found scattered around the Orr maps.)

Among other melee attacks, which I will leave as an exercise for the reader to analyze, the abomination will lower itself and prepare to charge.
If one just dodges backwards, there is a good chance that the forward rush of the abomination will crash right into you and interrupt you.
Dodging to the side moves out of the path of its rush.
Abominations are also a good dodging exercise as every hit they successfully land on you will build a visible frenzy stack. The more stacks they get, the faster and harder their attacks hit. Avoid enough of their attacks in sequence, and they will become stunned and lose their frenzy stacks.
Another use of directional dodging is to dodge -through- mobs to stay in melee range, while avoiding their directed frontal cone attack.

On first engaging most drakes, they will pause and glow for a second, then breathe their fire or poison breath attack. This is directed to where you were, when they first start the attack.
You could dodge backward or to the side and avoid the breath successfully, but if you were in melee before this, you will have to close back into melee range again before you can continue damaging it.
Dodging forward and through the mob (melee attack assist should be off) places you behind it, still in melee range to immediately resume attacking, while avoiding the breath attack.
3f: Movement and Positioning Strategies
In this next section, we will cover a few tried-and-true strategies for positioning both yourself and the mobs.
These can normally apply to almost any MMO, as the mobs tend to share similar AI, so as not to be too unfamiliar to a general MMO audience.
Kiting in a Line with Ranged Attacks
The most basic strategy for preventing damage to yourself is to play keep away with a mob that has melee attacks.

Imagine that the mob is a kite and you, the player, are holding the end of the string. Maintain the distance between you and it as you move, so that it can’t catch up to you.
Being able to speed yourself up with swiftness or traits or sigils, or slow the mob down with cripples or chills can be helpful. Or rooting the mob with an immobilize to keep it in place so that it can’t chase you for a while.
There are two problems you may encounter with this very basic strategy.
- Backpedaling is slow as compared to walking forwards.
- The mob may eventually leash itself and reset, running back to its original spawn position with its health returning back to full.
Kiting in a Circle with Ranged Attacks
So the next step from there is to kite the mob in a circle so that both of you stay in a localized area, preventing any reset from occurring.

This is where being adept at mouselook and strafing come in handy, as you generally want to be facing the mob most of the time to keep attacking it.
Turn away from it to make full use of your forward movement speed if you find the need to extend the gap between you and it, before turning back to the attack.
Some suggested mobs for practicing this:
- Veteran Trolls in the northwest Caledon Forest (east of Wychmire Waypoint)

- The Champion War Beast in Gendarran Fields (at The Beastpool POI)
- Chief Otyugh (Champion) in Fields of Ruin
These are all primarily melee mobs, so ranging in a circle will keep you mostly safe, and make it possible to solo even champions quite easily, given time.
Kiting in Melee
Ranging is all very well, but in Guild Wars 2, melee damage is the superior option when you want to do more damage and kill things faster.
The same idea applies, but now the radius of your circle is much smaller.
You may also not have to keep moving in a complete circle as you may want to face the mob away from other party members, so that its frontal attacks only hit those in front, and keeping its movements more predictable and thus easier to dodge. Strafing left and right and backing away just out of reach of its melee range should help to get out of the way of some/most of its attacks and mitigate some of the damage, though some of its more basic attacks may get through.
Moving or dodging through or behind the mob is always an option to keep in mind while kiting in melee, so as to avoid heavy hitting frontal attacks.
The rest of the time, damage while in melee can be mitigated with the judicious use of control or support skills, like blinds, blocks and reflects.
Using Line of Sight Around Corners or Obstacles
Melee mobs will obligingly chase you to kingdom come, regardless of where you’re standing, as they need to get in melee range to successfully attack you.
However, if you’re dealing with a mob that has a ranged attack or a caster who prefers to be standing at a distance all the time, you only have two options to get it in melee range.
1) You have to go to the mob.
The more casual speedy option is used when it’s not really important or immediately fatal to rush into battle wherever it is standing. Jog up to it, or close the gap with a leap or a charge, whatever. It’s not hard, it’s what people normally do.
The issue arises when designers have cunningly arranged it such that rushing into melee triggers other mobs to join the battle via a patrol or ambush or bystanders or what-have-you, or leaves you exposed to a barrage of fire from everything else in the room. So then…
2) You make the mob come to you.
A few classes will have some sort of pull skill that can reposition mobs to some extent, but everyone can manipulate mobs by making use of their AI.
When you attack a mob, it will want to return fire.
If it cannot see you, it will reposition itself so that it can see you, and then return fire.
Guess what, the only way it -can- see you if you’re hiding behind a handy corner, is to come around the corner….

…obligingly standing right next to you in melee range.
In MMO parlance, the one word laconic type of dungeon runner may refer to this strategy as “pulling” or “LOS,” though strictly speaking, it is “pulling a mob using line of sight (LOS) as a strategy.”
For newbies, a big giveaway that a group wants to use a strategy like this is when a few party members start piling into a corner, or jumping there seemingly impatiently, or saying things like “stack” (which means to stack up in the same spot together, on top of each other.)
Why this is important is because the strategy only works if all party members are out of sight (or in other MMOs, if the puller has very high aggro and taunt ability to hold its attention.)
The mob AI can often be perfectly content to start firing at any target that obligingly remains within view if the original puller vanishes from its sight. You probably don’t want to be that new target, so remember to get out of sight.
The goal of getting everyone to stack in the same spot together is to ensure that the mob will always come to the expected location, since everyone is there – given GW2’s sometimes unpredictable aggro rules – and then everyone can melee cleave down whatever comes together, and quickly revive anyone who gets downed since everything is piled up in the same location.
Corners are the most obvious way to break LOS, but other obstacles may work too.
It’s a good idea to experiment now and again to get to your unique MMO’s quirks (does this tree work? this lamp post? this rock or boulder?) so that when it becomes a real case of survival in a hard fight (nearly dying, break line of sight now or get grenaded to death), you can instinctively take cover.
Slowly Pushing A Mob in Melee
It is possible to slowly push a mob in melee by standing in the mob’s hitbox, probably as a result of collision detection that tries to avoid mobs and players standing in the same space together.
There’s no agreed upon name for this effect, but be aware that it is there.
(Me, taking a ridiculous amount of damage attempting to demonstrate this effect. Hopefully, you can discern a slight sliding around as the mob gets shoved against a corner in the rocks, then out of it. Else just take it as a demonstration of why one should not just stand in front of mobs to soak up damage. Ouch.)
Just like knockback and launches, this can be used for beneficial effect, like positioning a mob against a wall or pinning it in a corner for skills like a warrior’s Hundred Blades to make full contact for the duration of its channel, or can be annoying when mobs get pushed out of someone else’s range. You want to aim for the former, not the latter.
Attacking From Elevation / Hitting Through Walls
Other strategies that some may consider a little exploitative, include standing on something that puts you out of reach from a mob. Mobs may evade or go invulnerable to combat this tactic if they cannot reach you.
It is also possible to use the shape of melee cleaves and AoE skills to hit things through walls and over elevated structures.
In WvW, for example, it is possible to target people and arrow carts on walls by placing the AoE so that at least some of it extends over the walls. It’s also possible to hit people on a bridge by AoEing the bridge from below, and so on. Some dungeon runners will cleave through walls to avoid getting attacked by mobs, etc.
Whether you choose to use them or not, it’s good to know that these strategies do exist and that some people do use them and will expect others to follow suit when in their groups.
3g: A Quick Word on Aggro
Aggro in GW2 is based on a number of different factors, but in my experience, the biggest are toughness and proximity.
If you’re wearing Soldier PVT, and the more gear with toughness you put on, you have a higher chance of picking up the aggro.
Especially if you’re also going into melee range with the mob.
To drop the aggro, you may have to try backing away from melee range (assuming someone else has equivalent toughness and is in melee range with you) or, and this is more reliable, switch out gear to have no toughness on it.
This means the safest gear – if you don’t want to be primary target – is actually something like Valkyrie (with extra vitality, no toughness) or you can just go zerker, assuming you can dodge (and you’re learning that in this guide right now!)
Another factor is most damage dealt, which the mob may proceed to prioritize if there’s no heavy toughness/highest armor around.
Be aware that some mobs or mobs in some phases appear to turn this factor on its head, making aggro somewhat unpredictable in GW2.
They will go after the opposite – eg. Person with least toughness (and/or most damage) or furthest person (aka Mai Trin) or some other kind of special mechanic (eg. oozes in TA Aetherpath will aggro on the person with a blue teardrop over their heads – can’t get any clearer than that.)
This does mean that you have to be observant and situationally aware during fights to pay attention to who has aggro, and to react appropriately.
To take up aggro, try to get closer to a mob and do damage and put on high toughness gear. To drop aggro, do the opposite – back away, stop dps, be in low to zero toughness gear.
Except when the mob decides to act funny, then try the opposite of what you’re doing and see if that improves the situation any.
Note in some cases, the person with aggro is expected to perform some kind of mechanic, so it is everyone’s responsibility in GW2 to learn the responsibilities of what a ‘tank’ would do in other games, ie. survive, reposition mobs, etc. (eg. in TA Aetherpath, oozes are to be dragged or kited over a big black puddle. Good thing you know how to kite from the section above!)
How do you tell if you have aggro on a mob?
Well, it’s facing you and hitting you with lots of crap.
I repeat, this is a basic situational awareness skill that you should be practicing. Perhaps you’ve played other games where only the tank has to deal with things like this. In GW2, everyone needs to be aware and has a responsibility to know what to do if they happen to ‘tank’ aka have the aggro.
Everyone can do simple things like not panicking and running far away from the mob and letting it chase you while the rest of your party members are in hot pursuit or causing it to leash. (Kite in a circle if you really cannot survive standing still.)
For more intermediate tactics, try facing the mob away from the rest of the party if the mob has frontal attacks, so that the rest can get free hits in from the back and so on.
4a: The New Trinity – Damage / Support / Control
Guild Wars 2 does not have the typical MMO holy trinity of tank/healer/dps.
What it does have is damage / support / control, but all classes can perform these roles depending on the weapons, utilities and traits they pick and gear they are wearing.
Depending on gear, you can also be built bunker (aka tanky) or glassy (aka squishy)
The other differentiator is whether you do damage via raw attack power (power-based), or conditions such as bleeds, confusion, poison or torment (condition damage-based.) The first tends to be very bursty, and the second more attrition damage over time.
In WvW and PvP, there is room for more specialized roles. Some WvW roles include: a very tanky bunker supporter (good for commanders who need to survive till the last man) or a very supportive somewhat bunker group healer (to keep one’s group upright) or sturdy sustained control/damage (for frontline clashes) or glassy aoe backline to do damage and support, or glassy single target assassins to kill priority targets like the glassy backline, etc.
In sPvP, bunkers are needed to maintain control of a point, and will favor control options that help them knock others out of a point. There are also swift-moving roaming builds meant for going from point to point quickly, as well as more supportive builds meant to do well in teamfights on a point, and so on.
In PvE, there is less of a need for pure specialized roles and most dungeon runners and parties find the most optimal to be five hybrids, primarily very damage-focused glassy burst builds with just enough group support and control to mitigate damage long enough for a very offensively buffed burst to cut their way through mobs quickly.
Covering builds is not within the scope of this guide, one can Google for resources elsewhere and experiment to find what suits you best.
Just remember that these are all flexible and not to fall in a rut with one. Careful observation and analysis and changing to suit the situation will often stand you in better stead than one magic one-size-fits-all build.
There is, after all, no point operating a top dps meta build if you don’t even have the basics down of being able to observe a fight, analyze what mobs are doing using their animations and the combat log, move and dodge to avoid constantly dying or being downed, and select appropriate skills to counter the situation yet.
4b: Coping with Conditions
Conditions affecting you are located just to the right of your health, above your utility skills.

Look at this bar often. Don’t miss the small icons. They can do a lot of sneaky damage without you realizing.
Bleeding – Bleeds stack in intensity up to 25. Translation: The more bleeds on you, the more it’s going to suck. Try not to let them get beyond 10 at most, before clearing the condition.
It’s also helpful in a group to bring along condition removal that affects the party, because you may be able to save someone who isn’t able to clear his own conditions in time. Through experience, you’ll learn quite quickly what mobs apply bleeding in lethal amounts (eg. Aetherblade Swashbucklers and Mai Trin) and bring the appropriate skills to counter them.
Poison – Poison now stacks in intensity, just like bleeds. It does damage over time, and also reduces the amount you can heal. Be aware of this before reflexively firing off a heal, it may heal you for less than you expect, if you failed to clear the condition beforehand, which can be a lethal miscalculation in some situations.
Torment – Torment stacks in intensity and does damage over time. Its main schtick is that it will do DOUBLE the damage when you move. This can result in extra damage taken if you panic and move like normal, and also can set up dilemmas of ‘move and take extra damage / don’t move and get hit with something worse’
Confusion – Confusion stacks in intensity and does damage every time the affected individual activates a skill, be it manually or automatically. So be aware that dodging can also trigger it, if your traits are set up for some kind of skill activation on dodge, such as guardians healing, thieves dropping caltrops, and necromancers dropping marks on dodge rolls.
Yes, skill 1 is also a skill.
Confusion is the ultimate killer of auto-attackers who blindly let the game continue to attack for them while affected with multiple stacks of confusion. Knowing how to detarget quickly and stop attacking WILL SAVE YOUR LIFE.
Conversely, you can also turn off autoattack (by ctrl+right-clicking on skill 1) and get used to pressing 1 constantly, but for the latency ridden, this can affect how much damage per second you do.
What you do is up to preference but be aware that there are various methods available to prevent killing yourself automatically whenever confused.
The best is to expect when confusion is likely to happen, by recognizing mobs and players who often apply it (such as Aetherblade taskmasters, mesmers, etc.) and prepare to respond to it.
Fear – Fear stacks in duration and forces the target to run away involuntarily from the caster.
This is often used to hurl others off cliffs and other tall places, so it’s always advisable to be aware of what one’s back is toward, when facing someone or something capable of fearing.
Fear counts as both a condition and an interrupt/stun – so either condition removal or stun breaks will work to remove it. (However, while feared, one may not be able to cast a condition removal unless it is also a stun break, or one might get lucky and catch a condition removal from an ally.)
Immobilize – Stacks in duration and prevents the target from moving, turning or dodging. A way of halting something or someone in its tracks, it is used as a form of crowd control, to prevent a mob from approaching an area or to pin down a player and prevent them from running away.
Note that there exists a variant of immobilize that use destructible vines to hold someone (See Entangle, Grasping Vines and Binding Roots.) The roots will pulse immobilize and have to be destroyed by attacking (or when the skill duration expires) before the victim can move freely again.
Cripples, Chills, Weakness – These three conditions are not immediately fatal, but nuisances all the same. Cripples slow you by 50%, Chills go even further and reduce your speed by 66%.
Chill and weaken are especially insidious, they don’t appear to do much but can drastically affect how much damage you do and how well you can respond to attacks. Chills increase your skill cooldown by 66%, which means more skills on recharge once fired, be they attack or utility skills. Weaken reduces the rate of your endurance regeneration (less dodges once used) and turns half your blows into glancing ones that deal only half the damage.
Vulnerability – Vulnerability stacks in intensity, increasing how much damage the target takes by 1%, up to 25 stacks. Most of the time, one will be more concerned with -applying- vulnerability to mobs to maximize the amount of damage that can be done to it.
The above are sometimes used in PvP as “cover conditions.” Conditions are cleared via “first in, last out” so by layering extra less important conditions over the main damage-dealing condition that is meant to do the killing work, it makes it more difficult for the target to have sufficient condition removal to deal with the lethal stack.
Blinds – Blind causes the next attack of the target to miss. This is a little less effective on players, as many will be auto-attacking and will quickly remove it, but a well-timed blind can interfere with a heavy hitting attack or crucial crowd control. (eg. Blinding Nochtli in Dry Top during the phases where it jumps up and tries to knock players off the sparring rock will save everyone on the rock by causing that attack to miss, blinding a downed player just as they are using their crowd control skill to stave off being stomped can let a stomp go through without a hitch.)
To get around all the above, ArenaNet gave all classes Condition Removal abilities – learn them and use them well.
4c: Buffing with Boons
The opposite of conditions or debuffs, boons are the buffs of GW2.
Offensive Boons
Might – Might stacks in intensity and increases the Power and Condition Damage stats, leading to higher damage.
Much desired in parties, this is one of the holy grails that all group-supportive builds are seeking to increase. One of the ways that any class can contribute to building might is by utilizing combo fields – using a blast finisher in a fire field (more on this in the linked section below.)
Fury – Fury stacks in duration and increases critical chance by 20%. Critical hits deal extra damage, starting at 150% of one’s base attack damage, and being increased by the Ferocity stat.
Another holy grail of groups, having fury constantly granted to the party contributes to increasing the group’s damage and corresponding mob-killing ability. One thing to bear in mind is that certain bosses (objects with a large targeting reticle) cannot be crit, so fury is unnecessary for those fights.
Retaliation – Retaliation stacks in duration and damages anyone who lands a hit on a person with the boon. The formula has been derived by theorycrafters in the wiki link, but appears to be around 350ish per hit, assuming the person who gave the boon has 2000 Power at lvl 80.
This is a curious boon in that its effect is not very noticeable if you, the player, use it on mobs that attack infrequently and have a much higher health bar than 350 damage would hurt, or if you have a slow hitting attack and hit merely one target with retaliation on.
Conversely, if you have a very fast hitting attack, those 350 damage hits can add up quickly. Or if you hit a lot of targets with retaliation on – such as trying to spam AoE into a WvW zerg with retaliation on, that’s 350 x 5 players, or 1740 damage per attack you make.
Lastly, against certain boss mobs with a high level (and presumably very high Power) that buff themselves with retaliation, such as Pyroxis in the Queen’s Gauntlet when he grows larger in size, the retaliation damage correspondingly increases and players who aren’t paying attention and continue to autoattack can and often will proceed to commit suicide and down themselves.
If you’re suddenly taking a lot of damage from a boss or get downed all of a sudden while autoattacking, always check to see if they’ve put on a projectile reflection shield or a retaliation buff. You may need to stop DPS during the buff’s duration to save yourself from dying.
Defensive Boons
Protection – Protection stacks in duration and reduces incoming direct damage by 33%.
Protection is what I would term a ‘nice-to-have’ boon. It’s not essential, since much of the current GW2 combat meta is avoid large hits and negate all damage, and it doesn’t help with the damage-over-time from conditions, but if you have it, it would certainly help survivability by reducing the damage taken.
One thing to be careful of is not to overwrite a more desired combo field with one that gives protection – this usually happens with guardian hammer as it lays down a light field as it gives protection, and this can overlap on top of a fire field that folks want to be blasting in for might (a more valued boon.)
Aegis – Aegis stacks in duration and blocks the next incoming attack.
Now Aegis, on the other hand, is a very helpful boon as it completely negates the damage from the next incoming attack. The key is in proper timing. Just spamming it willy-nilly may block an attack, sure, but was it just a regular attack or one that would down your fellow player?
This is the signature hallmark of a great guardian as he or she can actually help or save another party member from receiving a large hit with perfect timing by granting aegis.
Essentially, instead of just watching mob animations to save yourself from big mob attacks, you are also keeping an eye on the rest of your party – where they’re standing, if they’ve seen or failed to see or dodge away from a big hit, and ‘blocking’ for the other four of them.
Regeneration – Regen stacks in duration and grants a small amount of healing over time. The formula is in the wiki link.
Another mildly ‘nice-to-have, couldn’t hurt’ boon, this can help give a party more survivability from small hits of damage, through an almost unnoticeable trickle heal effect, as long as they have or give themselves some breathing room to regenerate up some health. But it won’t at all save them from getting hit in the face by several large attacks and getting downed.
Utility Boons
Stability – Stability stacks in duration and protects against many ‘hard’ control effects – knockdown, pushes, pulls, launches, stuns, dazes, fears (and floating or sinking underwater.)
Another holy grail in the right situations, stability is a sought-after boon since it prevents ‘hard’ controls – ie. controls that make you lose control of your character and disable them in some way. Since it’s so powerful a boon, it’s also often a very short-lived one, so proper understanding of the right timing and situations to use it are key. Experience will give you knowledge of specific mob types that like to knockback, and then watching for their animations and pre-empting their control with stability will help protect you or your party.
Note that stability does not remove a control if it’s already taken place, it has to be used pre-emptively. (eg. Skills like “Stand Your Ground” are also a stun break and will help the guardian break out of their control effect, but the stability applied to their allies will not help them if they are already controlled. This is why WvW zergs will fire stability just before they clash, in anticipation of control effects – firing it while one’s comrades are already stunned in a static field will not help them.)
Also note that stability has no effect on conditions like cripple, chill or immobilize, which are more of a ‘soft control’ slow or a root. A condition removal skill is needed for that.
Vigor – Vigor stacks in duration and increases the rate of endurance regeneration by 100%, allowing for more frequent dodges.
This can be a very helpful boon to increase one’s survivability, especially if one feels like one is running out of dodges very often.
Swiftness – Stacks in duration, makes you go faster. ‘Nuff said. I’m sure you can find uses for this one.
4d: Combos
Combos are formed with a field and a finisher. These are marked on your skill tooltips.
Projectile finishers will create a combo if the path of your projectile travels across the field. (You can be standing in the field, have the projectile cross the field, or have the field on the mob as the projectile hits it.)
Leap finishers affect yourself with combo effects. Note that some effects (such as Fire Aura or Chaos Armor) cannot be stacked, but others – primarily stealth – can be stacked by leaping over the combo field multiple times. (This is a common favorite tactic of dagger/pistol thieves, who will leap 2-3 times over their own smoke field for a longer duration stealth.)
Whirl finishers throw multiple projectiles in random directions.
Blast finishers form AoE effects that affect a group, and are thus the most commonly used as party buffs.
The main fields to be aware of and recognize are fire fields and water fields. Blasting in the first will grant Might, and blasting in the second will throw up healing.
(All AoE effects affect 5 people, with priority going to party members within range, then others within range. Effects from combo fields act the same way.)
It’s important to avoid putting other fields on top of these two fields if a group calls for them, as they can interfere with combos from the desired field.
Light fields can be one major culprit, as they are easily produced with a hammer autoattack and greatsword 4 on guardians, both favored weapons of a pretty common class. Mesmers may be sometimes called on to hold or delay time warp, as they produce a ethereal field, until all the might-stacking is done and the fire field has dissipated.
Other situational field uses:
- Light fields are sometimes called for by WvW commanders when assaulting/defending a gate. Blasting in these throws up area retaliation. This has a protective effect against a zerg standing on the opposite side of the gate that might be trying to spam AoE damage through the gate (remember, hitting 5 people with retaliation multiple times in quick succession can add up and hurt!)
- Lightning fields (or static fields) can be used for group swiftness.
- Smoke fields can sometimes be used for group stealth.
- Very rarely, a dark field might be called for, to take advantage of lifesteal, using projectile finishers. Lifesteal is an effect that can sometimes go through invulnerability and can be abused that way (both WvW camp supervisors and Liadri in phase 1 were susceptible to this, before they were fixed.)
For a more comprehensive coverage of combos and the other field effects, further details can be read up on the GW2 wiki. There’s a wealth of interactions that can take place between each finisher and field.
The above, however, should cover the main uses that one will commonly encounter.
5a: Crowd Control and Interrupts
Crowd control skills generally affect movement and positioning of a target, or disables them from taking action.
- Pull – Pulls a target towards the caster (or the other way around, depending on the skill.) Note: if a pulling projectile is reflected, it pulls the caster towards the target instead.
- Knockback or Push – Knocks a target away, in the direction the caster is facing.
- Launch – Pretty similar to Knockback above, except it can affect downed targets and generally looks more spectacular, with the disabled period lasting a bit longer.
- Knockdown – Targets stay in place but are knocked to the ground and disabled for a short period of time.
- Daze – Prevents target from using skills for a short period of time. Players can still move around while dazed, NPCs are forced to remain still.
- Stun – Like Daze above, prevents target from using skills for a duration. Both players and NPCs are unable to move around while stunned.
- Fear – Forces target to run away from the caster for a duration and be unable to act.
- Float / Sink – Underwater skills that force a target to involuntarily move up to the surface or sink to the bottom respectively.
All the above cause interrupts if they land successfully while the target is engaged in an action, preventing the target from completing their current action and setting the affected skill on a 5 second cooldown.
Some other crowd control skills do not cause interrupts, but also somewhat interfere with free action, such as immobilizes, cripples and chills, covered in the conditions section above.
To counter these interrupting and disabling crowd control effects, stun breakers are used.
It’s generally advisable to have at least one stun break on your skill bar at all times and get in the habit of being able to fire them quickly to counter the effects, so that you’re free to act again.
More details on all these crowd control effects can be read on the GW2 wiki via the links above.
For the purposes of this guide, we are more concerned with how one might learn to use these to best effect. It’s all about timing, positioning and lots of practice.
Timing an interrupt means one has to observe the attack animations of the mob or player, and then fire the skill to interrupt that action.
The bad news is that many boss mobs will have stacks of Defiance, which gives them immunity to control effects. If they don’t, the first application of a control effect will give them Defiance stacks, ranging from 3 to a fairly insane number depending on the mob and how many players are scaling it.
If there’s a low number of Defiance stacks, it is sometimes worth the effort to apply more control effects to peel off the stacks one at a time, until the mob is once again susceptible to a desired control effect. Timing or coordinating this with others is very skillful play. (In a big crowd of players who are not coordinating or communicating though, it may not be worth the bother at all.)
Mastering positioning is key for being able to move mobs and players where you want them to go. Being familiar with the range on your crowd control skill and knowing how to position oneself in relation to the target so that the target goes where you want are all important. Many of the skills act in a line, some other skills act in a radial fashion out from the caster, and so on.
It’s also important to think about others if you’re playing in a group with them. Nothing annoys melee users more than someone knocking away a mob from their reach, causing their skills to miss.
However, that does not mean you have to forget about using knockback effects and forget that the button ever exists on your skill bar – there can be situationally helpful times to knock mobs INTO nearby walls and corners so that melee users don’t have to chase too far. Remember, melee users generally LOVE corners and walls so they can take advantage of a pinned mob to use their stationary channels and spins to do more damage.
In other fights with more specific mechanics, it can be valuable to position one mob next to another swiftly, or to keep one away from another, so learning how to use the control effects in your classes’ toolkit is worth the effort.
The most fun way to learn this is to just practice and play with some harmless mobs before moving onto things that offer more resistance and challenge.
Run out into the open world. Find a mob you don’t like the look of. Rearrange them where they’ll look better – in a corner, that tree over there. Fear them here, there, everywhere.
Play dolyak or asura ball with yourself or a partner.

Before you know it, it’ll be second nature to punt mobs or players around, and put them exactly where you want ’em to go.
5b: Playing with Projectiles
Many long range weapons have skills that fire projectiles (This will be marked on the tooltip, and can act as a Projectile finisher for combo fields.)
Projectiles have a traveling speed before they reach the target. It is possible for the target to run out of range and for them to miss as a result.
If you have no line of sight to the target, you will receive an Obstructed message, and the projectile will not hit either.
Some projectiles can be evaded or side-stepped, some will auto-track the target. Observation and trial-and-error will let you know which is which.
Some projectiles are capable of bouncing. Depending on the skill, this may be between enemies, or may be between an ally and an enemy. It can be possible to position oneself close to an enemy so that the bounces will ricochet off you several times and back into the same enemy for more damage.
A number of projectiles can be reflected or absorbed (aka blocking only projectiles) with skills. Reflection returns the projectiles to the source, while absorption will block and negate the projectiles.
Again, trial and error will let you know which projectiles are susceptible to this. Some attacks -seem- like they would be reflectable, but are not.
One easy mob type to test out reflects and absorptions are the Translucent Oozes in the far northwest Gendarran Fields near the skill point.

Both their single Vapor blade and 4-pronged Stealth Blades attack can be reflected.
Another easy champion solo with sufficient reflects and absorbs is the Bandit Captain Robbari in northwest Brisban Wildlands at the Robbari’s Bandits POI.
5c: Moving in the Blink of an Eye
Gap closers are skills that move the user from one location to another in a very short duration of time. They can be used to “close the gap” between a pursuer and their target, or conversely to widen the gap and escape if the user is the pursued.
Leaps move the user forward by increasing the movement speed of the player. As explained in the wiki link, some leaps are jumping leaps that allow players to jump across gaps in the terrain, while others are horizontal dashes.
Teleports and shadowsteps seem to work via more obtuse and less understood means. In general, they seem to work to move the caster to a location where the game can find a non-jumping path between origin and destination, and fail to work across gaps. Some teleports require a target to work, and others can be cast without a target or via ground targeting.
A few skills like Portal and Spectral Walk have more unique quirks.
For example, necromancers can use Spectral Walk to avoid falling damage by triggering the skill twice just a short distance before impact from a long fall. Spectral Walk ‘saves’ the position as just a short distance away from the ground, and Spectral Recall brings the necromancer back to that location to ‘begin’ his fall from that height.
As always, the best way to feel out the possibilities and limitations of these skills is to experiment, as well as observe, talk to and learn from expert users. There are many mesmers out there with excellent portal mastery, as well as thief videos showing commonly known shadowstep locations for certain maps and so on.
6: Conclusion
If you’ve made it to the end of this lengthy guide, I congratulate you.
Hopefully, you’ve found at least some nuggets of useful knowledge that will help you further in your quest to get better at movement and combat in GW2.
This is certainly not the final word on the matter, and is only the beginning of the journey. I look forward to walking it alongside you, hearing what you’ve discovered, learning with and from you too.

Fantastic article…..thanks for taking the the time!
LikeLike
I second that, extremely well explained and overall awesome article.
The community needs more people like you!
Thanks for all the effort that went into this guide.
LikeLike
I’ve been slowly making my way through this, and am learning a lot. Thank you for putting this together.
LikeLike
thanks for doing this – I’ve just started playing and I think this will be extremely useful 🙂
LikeLike
Hope it’s of some use! Don’t forget to take it slow and go easy on yourself when starting out. A lot of this just takes time and practice and familiarity with the game, always make time for fun first – whatever you define it as.
LikeLiked by 1 person
Wow. I just started playing a day or two ago and was looking for better keybinds, but got such a helpful guide on a bunch of different things. Thanks so much.
LikeLike
Some bits are a little outdated by now, especially references to gaining traits and so on. I have the vague intent to update it someday, but haven’t quite found the time yet – perhaps after all the expansion changes…
Glad it’s still helpful for you regardless! 🙂
LikeLike
P.S. I have performed a little emergency edit removing the most egregious outdated references, while awaiting a proper revision post-expansion.
LikeLike
Very good guide, most helpful thing I’ve seen for this game. I agree with the previous poster, this game needs more helpful people such as yourself. I hope you find the time to keep this up to date and/or do other guides. Thanks for putting in the work.
LikeLike
Very helpful. Thank you very much for taking your time. And one VERY BIG addition to this would be to add about “toggle action camera” which makes this game 3rd person shooter :). If you enable it you won’t have to hold right mouse button and you will have a small dot in center of screen just like any 3rd person game 😀 I just found it and thought I would share it with anyone else who might come here 🙂
LikeLike
Take a look here: https://www.guildwars2.com/en/news/introducing-the-action-camera/
LikeLike
Thank you very much for making this helpful guide, I have a question however, for movement WASD, you suggested to change the move to strafe left and right, can I ask on what bases you think strafe is best at all times ? Because I noticed that in fights , I automatically “strafe” to left and right even though my comands are on turn left and right , after the battle is over my A and D are turned back to turn left and right , so my question is , do you need strafe at all times? Because I find it uncomfortable and unefficent in normal world exploration, (you open map and can turn left or right to find your destination, however in strafe you always look to the front and strafe), so if you need strafe for tactical things during fights, A and D turns are automatically changed to strafe in fights so no need to change them permanently
Note: I removed strafe key binds from Q and E and changed them to skills, I’m not sure if this is a factor for my char to automatically strafe in fights.
LikeLike
The guide was written during a time when there were less camera options. It may be that strafing left and right automatically switches in now while looking around with the camera, or in combat. I haven’t tested it in a while.
The idea behind switching it permanently is to get used to mouse look camera and navigating with strafe keys so that the control scheme is familiar and instinctive, be it in or out of combat.
That said, whatever works most comfortably for you is the scheme you should adopt. The idea is mostly to give it some examined thought and try out what others commonly use, before adapting to your own unique needs, and not to accept the default unthinkingly.
With action camera now in place and increasing ability to toggle on and off various looking/targeting preferences, the ultimate goal is to customise keybinds and settings to what allows you to target, move and dodge effectively.
LikeLike
I accidentaly found this and I must say it is an excelent guide. Good job!
Not sure I have the reactions and/or the willingness to practise everything, but there are some things I have already incorporated.
PS: I see in other posts you are a newbie on poe, I could give you some advices there and answer questions about almost anything ^^. What’s the name of your character?
LikeLike
Thanks! I’m afraid I’ve been sidetrekked off PoE ever since Super Adventure Box came out. I was playing a Marauder called Faaiq for a while there, but I’m not sure when I’ll be back online in PoE again. I binge PoE in fits and starts (as much as a newbie can binge) then get distracted by something shiny, rinse and repeat.
LikeLike
Truly informative!!! Something you wrote some years ago still helps newcomers!!! I use a controller instead of a kb/m but the other 99% of this article i will use!!!Many thanks!!!
LikeLike
What an excellent guide! Well written, informative, and detailed. Just what a newbie like me needed. Thank you very much!
LikeLike
Amazing article, thx for putting in so much effort, it was very educating. I don’t post for like 90% of the articles I read but I would have honestly felt guilty if I didn’t show some appreciation for this :D. Again amazing job and thank you kind sir. 🙂
LikeLike
Thank you very much! What a fantastic guide. Easy to understand for new players and just enough detail so as not to be overwhelming. I’ll be using this for quite awhile (please do not take it down)..
LikeLike
Thank you so much. Very useful and very practical. Really appreciate the time and effort put into making this.
LikeLike
Thanks dude! this help me alot 🙂
LikeLike